The Jamf Pro GUI allows you to automatically set up the necessary payloads to manage the FileVault 2 Recovery Key Escrow process for macOS 10.13+.
However, the settings reside in the "Security & Privacy" grouping within the Jamf Pro GUI. Configuring only Recovery Key Escrow settings within the "Security & Privacy" tab will effectively enforce the default settings for all other preferences within the grouping. Using the built-in options, you may inadvertently enforce settings you don't intend. This may lock your users out of being able to make changes to the firewall, analytics settings, screen saver password requirement, and other settings.
You can upload a custom profile to the Jamf Pro Server that manages only FDE Recover Key Escrow preferences, but it takes a little work.
You'll also need to sign your resultant configuration profile to prevent the Jamf Pro Server from manipulating its contents or preventing deployment. You can use an Apple Developer certificate, or your Jamf Pro Server's CA (if self signed).
FileVault2 Recovery Key Escrow in macOS High Sierra (and later)
FileVault 2 Recovery Key Escrow requires installing a Configuration Profile on
your endpoints with a com.apple.security.FDERecoveryKeyEscrow payload.
Automaticlly escrowing a Personal Recovery Key to Jamf Pro requires
working MDM to function.
Recovery Key Escrow works by encrypting the Personal Recovery Key with a known
signing certificate. macOS writes the encryped recovery key to
/var/db/FileVaultPRK.dat, which is made available to your MDM server when it
sends a SecurityInfo command. Jamf Pro takes care of these implementation
details for you, including scheduling regular SecurityInfo MDM commands.
The Recovery Key Escrow policy must be present on the system before it is
encrypted in order for the key to be written to /var/db/FileVaultPRK.dat. If
the machine is encrypted prior to installation of the Escrow profile, you will
need to change the recovery key to have /var/db/FileVaultPRK.dat updated, and
the key subsequently available for Jamf Pro. Elliot Jordan's
jss-filevault-reissue can
assist with rotating Personal Recovery Keys. I contributed the initial code to
support Recovery Key Escrow in High Sierra and can confirm this process works.
Full details are available in Apple's Configuration Profile Reference document.
FileVault2Comm Signing Certificate
When you install Jamf Pro, the built-in certificate authority issues a signing
certificate with subject CN=JSS Built-In Signing Certificate,OU=FILEVAULT2COMM, which is used for FileVault 2 Recovery Key
Escrow. We need that certificate for inclusion in the custom profile we're
building.
Since the Jamf Pro Server's built-in certificate authority issues the FileVault2Comm signing certificate, it holds the private key necessary to decypt data that's been encrypted using it.
The Jamf Pro GUI does not provide a facility to download it directly, so we'll need to employ a workaround by building a temporary profile.
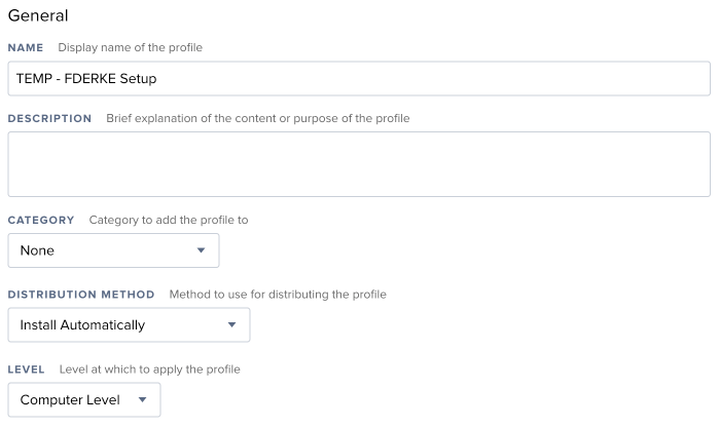
Create a Temporary Configuration Profile in the Jamf Pro Server
To generate an appropriate encryption certificate, we'll create a temporary configuration profile within the JPS. Name it something disposable – you'll delete it when done. "TEMP - FDERKE Setup" works. Set the level to "Computer level." Make sure you do not add a scope to the profile; we're not deploying it.
Click the "Security & Privacy" group on the left, then click "Configure." Select the "FileVault" tab. Apply these preferences:
- Checked: Enable Escrow Personal Recovery Key
- Escrow Location Description: Describe where the recovery key is being shipped. This is visible to the end-user, so "My Company IT" or whatever is appropriate. We'll edit this elsewhere, so you can leave it blank.
- Device Key for Escrowed FileVault Recovery Key: Text displayed at the FileVault unlock screen when a user has apparently forgotten their password. Despite the help text, you should leave this blank. By default it will be replaced with the device's serial number which will aid your technicians in recovering the correct key. You might think to put your IT department's support phone number or similar here; that's not the intention of this field. Per Apple:
An optional string that will be included in help text if the user appears to have forgotten the password. Can be used by a site admin to look up the escrowed key for the particular machine.
- Personal Recovery Key Encryption Certificate: Set to "Automatically encrypt and decrypt recovery key." This tells Jamf Pro to generate a signing certificate for use encrypting a device's Person Recovery Key. Selecting this option ensures Jamf Pro has the appropriate private key to decrypt the recovery key when collected by an MDM command.
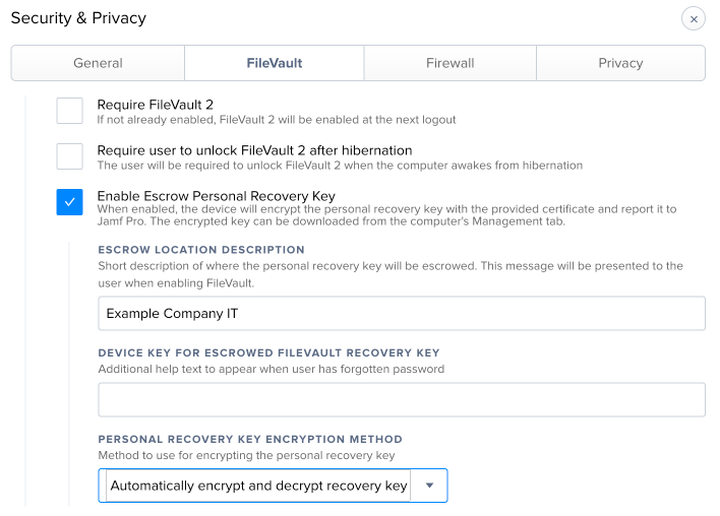
Save the profile, then click the "Download" button.
Grabbing the Signing Certificate
Next we'll convert the profile to a readable format so we can access the encryption certificate provided by Jamf. In Terminal, run these commands:
security cms -D -i /path/to/downloaded/profile.mobileconfig -o /path/to/de-signed.mobileconfig
plutil -convert xml1 /path/to/de-signed.mobileconfig
Copy
template-fde-recovery-key-escrow.mobileconfig
to a new file in your favorite text editor. Change the values of
PayloadOrganization and Location as needed to match your organization. There
are several instances of each key in the profile so be sure to change them all.
Open the de-signed profile originally downloaded from the Jamf Pro Server in
your text editor. Find the PayloadContent below PayloadCertificateFileName –
it's the big, obvious block of certificate data.
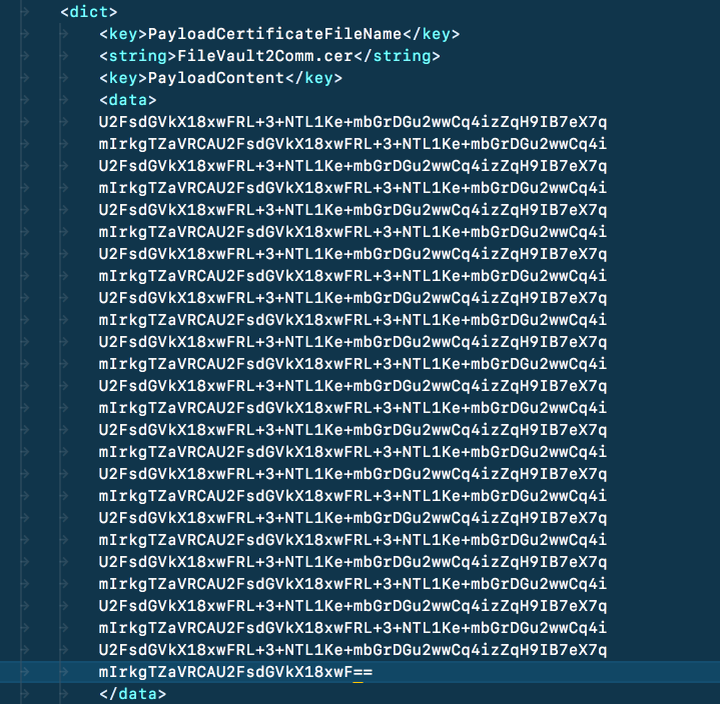
Copy and paste this to the same location in your edited
template-fde-recovery-key-escrow.mobileconfig file, making sure you get the
indentation correct. Save this file with a suitable name like FileVault Recovery Key Escrow.mobileconfig.
- Sign the new profile thusly:
/usr/bin/security cms -S -N "Common Name of signing certificate in your keychain" -i /path/to/FileVault\ Recovery\ Key Escrow.mobileconfig -o /path/to/Signed-FileVault\ Recovery\ Key\ Escrow.mobileconfig - Delete the temporary configuration profile from your Jamf Pro Server.
- Upload your completed
Signed-FileVault Recovery Key Escrow.mobileconfigprofile to your Jamf Pro Server, then set an appropriate scope and deploy it.
References
This article was originally published as a Gist.
Thanks to @opragel for the template/example configuration profile.