Part of my job is to test (and re-test) first-time setup workflows for new and repurposed Macs.
I recently needed to analyze the flow of network traffic during initial MDM enrollment to confirm an on-premise network was permitting all required traffic.
The tcpdump tool – included with macOS – is a powerful utility that allows you
to record all network traffic passing through any interface on the Mac. It
requires elevated privileges to run, however. This presents a problem, since we
do not yet have an account capable of running elevated processes during Setup
Assistant. We haven't even created a local account yet!
To work around this, we need to enable the root account before proceeding
through Setup Assistant.
I strongly recommend doing these sorts of analyses on a dedicated test Mac that you don't mind erasing. Gather the data you need, then erase it.
Reinstall macOS
First, we need to return the Mac to a "fresh" state by reinstalling macOS.
Apple provides complete instructions on reinstalling the operating system.
If you're using a Mac with an Apple Silicon chip, you can very quickly restore the Mac using Apple Configurator.
Enable root from macOS Recovery
Next, we need to temporarily enable the root account by setting a
password for it. We'll disable it later, but this is required to be able to
run privileged processes during Setup Assistant.
-
Start up the Mac in Recovery mode.
-
Once Recovery loads, select Utilities > Terminal on the top menu to open a Terminal window.
-
Initiate a password reset for the
rootaccount using the following command, depending on whether the Mac has an Apple Silicon or Intel chip:For a Mac with an Apple Silicon chip...
dscl -f /Volumes/Data/private/var/db/dslocal/nodes/Default localhost -passwd /Local/Default/Users/rootFor a Mac with an Intel chip...
dscl -f /Volumes/Macintosh\ HD\ -\ Data/private/var/db/dslocal/nodes/Default localhost -passwd /Local/Default/Users/root -
When prompted to enter a
New password:, type in the password you wish to use with therootaccount. The value will not be displayed on screen, and you will not be prompted to confirm it, so use caution. -
Restart the Mac by typing
rebootthen pressing Return.
Open a Terminal during Setup Assistant
When you start up the Mac, you'll see the "hello" screen and Setup Assistant will begin. Select your language to continue.
Next, press ⌃ Control + ⌥ Option + ⌘ Command + T on the keyboard to open a Terminal window.
Terminal will open in the background, and you'll be able to switch back and forth between the Setup Assistant and Terminal windows.
Setup Assistant runs under the temporary _mbsetupuser user account. This is a
standard – rather than administrator – account. Elevate to root by typing su -, then entering the password you previously set for the root account in macOS
Recovery.
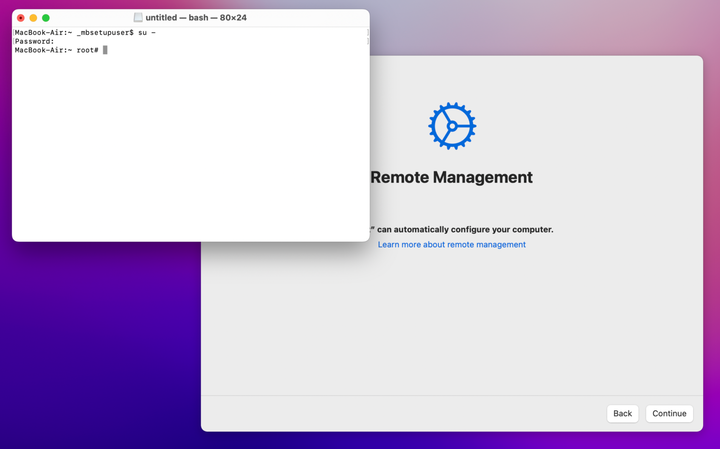
Great, now we have a root shell!
Run tcpdump
With a root shell, we can run elevated processes like tcpdump.
Advance through Setup Assistant until you reach the Remote Management screen. Switch focus to the Terminal window, then run:
tcpdump -nn -i any | tee -a /Users/Shared/enrollment.dump
This will display all traffic for all network interfaces, and will skip reverse resolution of network addresses to DNS names. I find these options useful to see where traffic is flowing, and the unresolved IP addresses and port numbers are the relevant bits of information I'm after.
I also use the tee program to simultaneously print the traffic to standard
output and also save a log to a known location. Writing the output to a file
within /Users/Shared ensures the file persists through any reboots and is
accessible once Setup Assistant completes. You could use tcpdump's -w flag
to save the output to a file, but this creates a binary file that isn't
immediately readable. Using tee is my personal preference.
There are tons of options for tcpdump, which is not the point of this post. I
recommend Apple's developer documentation on recording a packet
trace, and Daniel Miessler's tcpdump tutorial for
extensive help using the tool.
Clean up
Once MDM enrollment completes, switch focus to the Terminal window and press
⌘ Command + C to quit the tcmpdump process.
The packet trace is displayed in the Terminal window for you to analyze. If
you've also tee'd the output to a file, you'll be able to copy that
file to another system for analysis after you've completed Setup Assistant.
The only thing left to do is disable root login. Do this from your
administrator-level account by running:
dscl . -create /Users/root UserShell /usr/bin/false
Or – since you're doing this on a test device – erase the Mac and start over fresh!